
Reference from :
ACUPRESSURE RESEARCH, TRAINING & TREATMENT SANSTHAN
ALLAHABAD, INDIA
ACUPRESSURE INSTRUMENTS
01. Micro Magnets
02. Surgical Paper Tapes
03. Diagnostic Stick/Probe
04. Pencil Jimmy
05. Flexible Acupressure Ring
06. Hand Roller (Karela)/Acupressure Ball
07. Foot Roller
08. Thumb Pad
09. Sinus Cure Device
10. Pyramid Plate
11. Solar Setter/Pump
12. Spine Roller (Mouse)
13. Electro Point Finder/Stimulator
MICRO MAGNETS
Description and Use
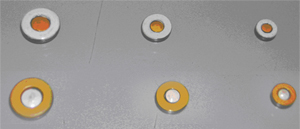
Numerous varieties of magnets of various sizes, shapes and potency are used in magnet/acupressure therapy. Presently, the Sansthan uses ten types of micro magnets for acupressure therapy.
Star Magnet (Medium/Standard). A small magnet with its North Pole side circular shaped and South Pole side star shaped. Diameter – approximately 5 mm. Used for balancing the energy in the required part of the body. When applied, the star of the magnet should touch the body skin.
Star Magnet (Large). It is the same as star magnet (standard) with the difference that it is slightly larger in size with a diameter of approximately 7 mm. It is used for classical Chinese points which are bigger in size, for byol points on the palms, feet and fingers with greater inter point distance, for EAV points and where greater magnetic power is required.
Star Magnet (Small). It is the same as star magnet (standard) with the difference that it is slightly smaller in size with a diameter of approximately 3.5 mm. It is used when the energy points on the body surface are smaller, for example, smaller fingers of ladies/children, toes of feet, etc. and where lesser magnetic power is required.

Large Standard Small
Byol Magnet (Medium/Standard). A circular, dual polarity small magnet. Diameter – approximately 5 mm. Its one side is painted white and the other side painted yellow. This type of magnet is used for tonification/sedation, i.e., increasing/decreasing of energy level in the required part of the body. For carrying out tonification, the yellow side of the magnet (North pole) should be touching the body skin and the white side should be visible to the eyes after application. For carrying out sedation, the white side of the magnet (South pole) should touch the body skin and the yellow side should be visible to the eyes after application.
Byol Magnet (Large). It is the same as byol magnet (standard) with the difference that it is slightly larger in size with a diameter of approximately 7 mm. It is used for tonification/sedation of classical Chinese points which are bigger in size, for byol points on the palms, feet and fingers with greater inter point distance, for EAV points and where greater magnetic power is required.
Byol Magnet (Small). It is the same as byol magnet (standard) with the difference that it is slightly smaller in size with a diameter of approximately 3.5 mm. It is used for tonification/sedation of energy points on the body surface, which are smaller, for example, smaller fingers of ladies/children, toes of feet, etc and where lesser magnetic power is required.
White Byol Magnets for Tonification
Large Standard Small

Large Standard Small
Yellow Byol Magnets for Sedation
Chakra Magnet (Medium/Standard). It is a circular, two-piece magnet with the overall diameter of approximately 11 mm. The outer magnet has a hole in the center, making it ring shaped. It is painted white on one side and yellow on the other side. The standard byol magnet fits into the central hole of this ringed magnet. Tonification occurs when the yellow side of the central byol magnet along with white side of outer ring touches the body skin. Sedation occurs when the white side of the central byol magnet along with yellow side of outer ring touches the body skin. This type of magnet is used for tonification/sedation of ‘yogic’ chakras and for classical acu points requiring greater magnetic power than the byol magnets. This magnet can also be used for byol points in certain circumstances.
Chakra Magnet (Large). It is the same as chakra magnet (standard) with the difference that it is slightly larger in size with the overall diameter of approximately 14 mm. The large sized byol magnet fits into the central hole of the outer ringed magnet. This magnet is used for tonification/sedation of ‘grah’ chakras No. 1, 2, 3, 4 and on classical Chinese points where still greater magnetic energy is required.
Chakra Magnet (Small). It is the same as chakra magnet (standard) with the difference that it is slightly smaller in size with the overall diameter of approximately 9 mm. The small sized byol magnet fits into the central hole of the outer ringed magnet. This magnet is used for tonification/sedation of ‘yogic’ chakras and classical acu points in the case of children.
Chakra Magnets for Sedation
Large Standard Small
Large Standard Small
Chakra Magnets for Tonification
Cluster Magnet (Star). In few types of treatment, clusters of four or five star magnets need to be applied on the acu points. The therapist places one star magnet in the center of the acu point and the remaining star magnets around the central star magnet. For the convenience of therapists, pre fixed cluster of four/five star magnets glued on to a plastic surface have been designed and do away with the need for therapists to form their own clusters.
Cluster Magnets (Star)
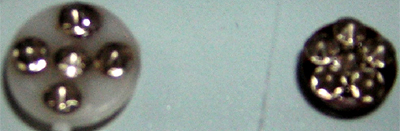
Cluster of Five – Plus Shaped Cluster of Six – Flower Shaped
Method
These magnets are fixed on the palms, fingers, feet, toes or other body parts for various duration of time as decided by the acupressure therapist. The magnets are fixed on the body parts with the help of adhesive, surgical paper tapes.
Precautions
Byol and chakra magnets should be used only under the guidance/directions of a trained acupressure therapist for a specified period of time. Star magnet is relatively safe and may be used without guidance. In all cases, the magnets should be removed immediately on appearance of any adverse symptom, i.e., discomfort, heaviness, pain or numbness in head or any body part, nausea, uneasiness, sudden change in blood pressure, body temperature, etc.
SURGICAL PAPER TAPES
Description
These come as adhesive, paper tape rolls and are in two sizes. The thin tape is one inch broad and the thick tape is two inches broad. These are easily available at any chemist shop.
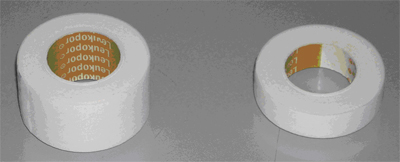
Two-Inches Surgical Paper Tape One-Inch Surgical Paper Tape
Use
Used to fix magnets or seeds over a body part.
Method
Tear off the required length of paper tape from its roll. Fix the required magnet/seed over its adhesive portion and then place the tape over the required body part. Press firmly the tape so that it does not subsequently come off.
Precaution
Avoid frequent washing of the affected body part as the tape may come off. If inevitable, dry the tape with a piece of cloth immediately after it gets wet. Be careful in removing the tape over a hairy area of the body so that the hair does not come off along with the tape. Do not use synthetic/cello tape in place of the paper tape as this may cause skin disease of the affected part.
DIAGNOSTIC STICK/PROBE
Description
A simple metallic stick of approximately 10 cm length. Its both ends are rounded off, one end being slightly bigger than the other. In its deluxe model, a long, cylindrical, movable ring with serrations is mounted on the central part of the stick.
Diagnostic Stick/Probe
General Model Deluxe Model
Use
Used to diagnose sensitive acu points. Also used to treat these very points. The probe can also be used to give a generalized massage on any part of the body.
Method
Move the rounded end of the probe over the required search area of palms, fingers, feet or toes with uniform pressure. The most sensitive point will respond with a typical, sharp pain and is the acu point. To treat the acu point, press the same with the probe for the required length of time. For giving generalized massage, roll the probe along its length over the required part of the body.
Precaution
Apply just adequate pressure. Sharp pressure may cause intolerable pain to the patient. The skin may also tear in case the same is very thin.
PENCIL JIMMY
Description
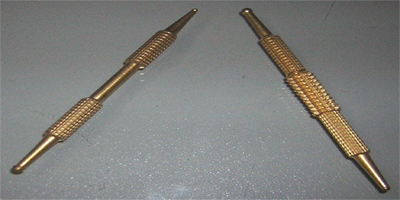
A wooden stick of approximately 14-15 cm length and an average diameter of approximately 1.5 cm. Its both ends are rounded off. One end is thick while the other end is pointed. Most of the length of the jimmy is serrated.

Pencil Jimmy
Use
Just like the diagnostic probe, used to diagnose sensitive acu points but which are bigger in size. Also used to treat these very points. The jimmy can also be used to give a generalized massage on any part of the body.
Method
Move the rounded end of the jimmy over the search area of the body with uniform pressure. The most sensitive point will respond with a typical, sharp pain and is the acu point. To treat the acu point, press the same with the jimmy for the required length of time. Use the serrated portion along the length of the jimmy to roll over the required body part to give generalized acupressure treatment.
Precaution
Apply just adequate pressure. Sharp pressure may cause intolerable pain to the patient.
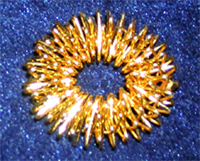
FLEXIBLE ACUPRESSURE RING
Description
A thick, flexible, metallic ring of approximately 10 mm inner diameter, 25 mm outer diameter and 7.5 mm thickness. The ring comprises of many strands of metallic wire.
Flexible Acupressure Ring
Use
Used to stimulate energy points on fingers and toes to give generalized or specific acupressure treatment.
Method
Roll the ring over the finger/toe from the base to the tip several times with adequate and uniform pressure. For generalized treatment, roll the ring over all ten fingers or over all twenty fingers/toes for better results. Roll over each finger for about half to one minute. Perform two or three times a day. For specific treatment, roll over the specified finger/toe or over the specified joint of a finger/toe.
Precaution
Never wear the ring in a finger or toe for any length of time. The ring is meant to be moving along the fingers/toes and is not to be left in place or else it will hamper blood circulation.
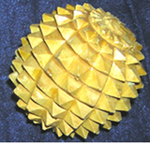
HAND ROLLER (KARELA)/ACUPRESSURE BALL
Description
The hand roller (karela)/acupressure ball comes in various shapes and sizes and is made of wood, plastic or any other hard material. The current versions with the Sansthan are made of wood. The hand roller is approximately 13-14 cm long and has an average diameter of approximately 3.5 cm. The acupressure ball has an approximately diameter of 6 cm. Both the items have got sharp teeth all along their surface.
Hand Roller (Karela) Acupressure Ball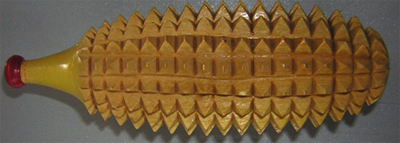
Use
Used to give generalized acupressure treatment on the palms.
Method
Roll the hand roller (karela)/acupressure ball over the palm on both its front and back or as required. Alternately, grip the instrument in the fist and hold for 20 to 40 seconds at a time. About five minutes treatment is adequate.
or three times a day. For specific treatment, roll over the specified finger/toe or over the specified joint of a finger/toe.
Precaution
Roll or press with just adequate pressure. Avoid too hard a pressure or else the skin may get damaged.
FOOT ROLLER
Description
It comes in various shapes and sizes and is made of wood, plastic or any other hard material. The current version with the Sansthan is made of wood. The foot roller is approximately 28 cm long and has an average diameter of approximately 4-5 cm. It has got sharp teeth all along its surface.
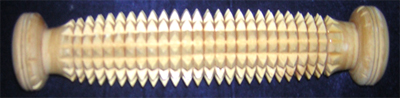
Foot Roller
Use
Used to give generalized acupressure treatment on the feet.
Method
Sit comfortably on a chair/stool. Place the foot roller on the ground below the feet. Press and roll both the feet on the foot roller forward and backward for about 5 minutes.
Precaution
Press and roll with just adequate pressure. Avoid too hard a pressure or else the skin may get damaged.
THUMB PAD
Description
This is a flexible rubber/plastic pad of about 3.5 cm by 2 cm size, with pointed and hard bristles fixed at one end and a strap that can be tied around the thumb.
Thumb Pad
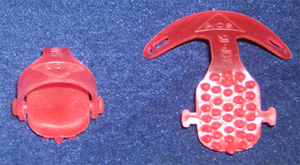
Strapped Position Opened Out
Use
It is used to apply pressure on various parts of the palm or feet to give general/specific acupressure treatment.
Method
Simply strap the device around the thumb and press the bristled end of the pad on the required part of the palm or feet for the required length of time.
Precaution
Apply moderate pressure. Do not apply too hard a pressure that may cause distress to the subject.
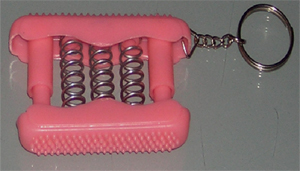
SINUS CURE DEVICE
Description
The device consists of two long plastic bars, inter connected with three metallic springs. The outer surfaces of both the bars have numerous, small rounded projections on them. It is a handy device that can easily be put in the pocket; hence a key ring is often attached for the convenience of the user.
Sinus Cure Device
Use
As per reflexology branch of acupressure, sinus points are located on the tips of all the fingers. This device is used to provide acupressure treatment for all types of sinus disorders by applying pressure on the tips of fingers.
Method
Hold the device in the palm of any one hand in such a manner that one bar is
resting in the center of the palm and the tips of fingers on the outer surface of the other bar. Now, try to compress the springs using both the palm and the fingers. Most of the pressure will be felt by tips of the fingers, thus stimulating the sinus points. Hold the spring in compressed position for about 20 to 40 seconds. Repeat the operation two or three times. Now, perform the operation with the other hand. Do twice or thrice in a day.
Precaution
Do not hold the spring in a compressed position for more than 20 to 40 seconds at a time. Do not compress so hard as to cause distress.
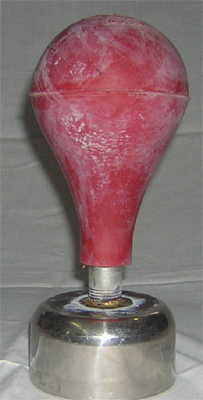
SOLAR SETTER/PUMP
Description
This consists of three parts. The first part is a flexible, hollow, thick walled rubber device in the shape of the old fashioned light bulb, with its thinner end open. Its approximate dimensions are: length – 14 cm, diameter at its broadest part – 10 cm, diameter at the lower open end – 3 cm, rubber thickness – 5 mm.
The second part is a metallic bowl (katori) of approximately 9 cm diameter and 5 cm height, with a hole of about 1.2 cm diameter in the center of its surface.
The third part is an approximately 5 cm long, hollow metallic pipe of about 2 cm diameter. One end of this hollow pipe is welded permanently on to the central hole on the outer surface of the metallic bowl, whereas its other end is free and is inserted into the open end of the rubber device. There is thus an internal connection between all the three parts of the solar pump, which allows the air to pass through from one end to the other.
Solar Setter/Pump
Use
A large number of disorders/diseases of the human body are attributable to disturbance of the solar nervous plexus located below the navel in the abdomen. It is well known that a mere setting right of the solar plexus results in alleviating a majority of such disorders fully or partially. It is also seen in many cases that if the solar plexus is displaced, acupressure treatment is not effective. The importance of correcting the solar plexus can thus hardly be over emphasized. There are many methods of correcting a disturbed solar plexus. The solar setter/pump is one such effective and convenient device that is used to correct the disturbed solar plexus.
Method
The patient should lie down on his/her back on a flat, hard surface with both legs touching and stretched. The arms should also be stretched and be resting on the sides of the body. The patient himself/herself or another person should then place the solar setter directly over the navel. To place the solar setter on the navel, press deeply the solar setter’s top closed, broader end with the fingers, thus allowing the air to escape out from the device and then gently put it on the abdomen in such a way that the center of the bowl is directly over the navel. The solar pump will now stay put in its place on its own and will gradually bring the displaced solar plexus in the center of the abdomen due to its vacuum action. As the displaced solar plexus keeps moving towards the center of the abdomen, the pressed rubber device will keep opening out gradually. Once the solar plexus is fully corrected, the solar setter will fall off on its own. If the solar setter does not fall off on its own within half an hour, it is unlikely that solar plexus will get corrected in one session and the exercise should be terminated for the day. To remove the solar setter, press one side of the abdomen with a finger, thus allowing air to rush into the device that will then fall off.
After the exercise is complete, the person should gradually turn the body to the Left and gradually get up. It is important to get up gradually to avoid re-displacement of the just corrected solar plexus. The exercise should be carried out daily till the solar plexus is firmly set in its correct position.
Precaution
Never attempt to use the solar setter on a full stomach. The exercise is best done first thing in the morning on empty stomach after the routine ablutions.
Children below 8 years, very old and weak persons, abdomen surgery cases, umbilical hernia cases and pregnant ladies must not use the solar setter. There are other methods available to correct the solar plexus of such persons.
If the solar setter does not fall off on its own in the stipulated time, strictly follow the method to remove it from the abdomen as described above. Never attempt to pull off the solar setter from the abdomen as it may severely tear the abdominal skin in the process.
SPINE ROLLER (MOUSE)
Description
A wooden or plastic device about 17-18 cm long with four wheels attached to its bottom, just like the wheels of a toy car. The front two wheels are fixed about 2.5 cm apart and have a width/thickness of about 4-8 mm. The wheel diameter is about 5-6 cm. The rear two wheels have similar dimensions. The body of the device on the top is hollow shaped so that it can be gripped easily with the hand. The whole device looks somewhat like a mouse and hence it is often referred to as mouse.
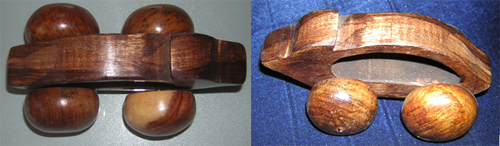
Spine Roller – Top View Spine Roller – Side View
Use
The device is used to give general spine acupressure treatment to tone the complete nervous system of the body. As we know, peripheral nerves emerge from the spinal column and reach out to all parts of the body. Even the slightest disorder of a peripheral nerve affect the functioning of the corresponding part of the body being supplied by that particular nerve. It has been seen that general spine acupressure treatment using this device is greatly beneficial to improve the functioning of the nervous system. In most cases, spine treatment has immediate effect in alleviating minor diseases and painful conditions of the body. Its use over a number of days is also helpful in alleviating major diseases. A person feels greatly refreshed and invigorated after a session of spine treatment and is thus extremely useful in alleviating fatigue.
Method
A person cannot perform this treatment on one’s own and needs the assistance of a therapist or a knowledgeable helper. To perform the treatment, the subject should lie down straight on his/her abdomen on a flat, hard surface, preferably on a table. The legs should be in contact and be fully stretched. The arms should be by the side of the body. The head should be straight and be resting on the chin.
The therapist should now perform spine treatment as per the following steps:
Place the spine roller on the upper end of the subject’s neck in such a way that the wheels are equally on either side of the vertebrae.
Press down the device with moderate force once or twice.
Roll down the device 1.5 cm to 3 cm and again press down the device once or twice.
Continue the process of rolling and pressing down the roller till it has reached the last vertebra, i.e., the coccyx (tail bone). The spine treatment is now complete.
The process can be repeated once or twice as per requirement.
Precaution
The pressure applied should always be moderate. Too hard a pressure may damage the spine whereas too light a pressure may not have the desired effect. Instruct the subject to immediately inform if the desired pressure is incorrect.
The spine roller must be centered all the time, i.e., the wheels must be equally on either side of the spine or else, the vertebrae might get damaged.
The device must always be rolled down starting from the neck and terminating at the coccyx. It must never be rolled up from the coccyx to the neck.
The treatment should be taken on light stomach, i.e. neither heavy nor empty. Avoid taking the treatment for at least two hours after a meal.
Do not repeat the steps more than twice, i.e., not more than three steps. One treatment a day is adequate.
ELECTRO POINT FINDER/STIMULATOR
Description
The device comes in three parts, i.e., the main instrument, out put leads and an electric adapter. The main instrument, i.e., the electro point finder/stimulator has an approximate dimension of 8 cm by 6 cm by 2.5 cm. It has a regulator in its center to control the output voltage/current. Markings from zero to ten are etched around the regulator knob. Each marking indicates .4 volt and the ten markings indicate a total of 4 volts. Just below the regulator are located two switches side by side.
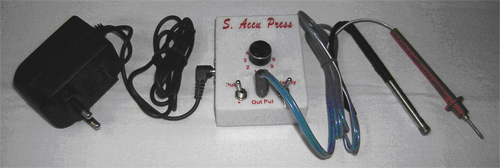
Electro Point Finder/Stimulator
The Left side switch is marked as ‘Pulse’. It has two positions marked as + (plus) and – (minus). When on plus, the instrument gives out continuous direct current (DC). When on minus, it gives out intermittent alternate current (AC). The Right side switch is marked as ‘Polarity’ and has as similar marking of + (plus) and – (minus). When on plus, the instrument gives the optimum out put of 4 volts and when on minus, its output is halved to 2 volts. There is a socket in the middle of the two switches meant to insert the output lead, i.e., the output socket. There is another socket on the side of the instrument to insert the input lead from the adapter, i.e., the input socket.
The out put lead has one wire at one of its end and two wires at the other end. The one-ended wire is meant to be inserted into the output socket of the main instrument. The two-ended wires have separate metallic leads attached to them. One is thick and elongated earthing lead and is meant for earthing the current. The other is thin and elongated point finder/stimulator lead and is meant to find/stimulate the acu points.
The electric adapter is meant to convert the main 220 volts alternate current (AC) to 4 volts direct current (DC). It is meant to be plugged directly into the mains socket. A wire from the adapter gets plugged into the input socket of the main instrument. The main instrument works either on its internal cell batteries or through the mains. When working on the batteries, there is no need to use the adapter.
Use
The device is a multi purpose apparatus meant for diagnostic and treatment purposes. In its diagnostic role, it detects a disease, often before its symptoms become manifest. In treatment role, it treats the acu points by their electrical stimulation.
Method
Connect the output lead to the main instrument. Connect the input lead from the adapter if it is desired to draw current from the mains. Place the thick earthing lead of the two-ended wire in between any two fingers of any one hand, say, the earthing hand. The other thin point finder/stimulator lead is now available to find/stimulate points on the other hand, say, the active hand.
For diagnostic purpose, the ‘Pulse’ switch should be kept at the plus position, i.e., on continuous current. The ‘Polarity’ switch should also be kept at plus position, i.e., at 4 volts. The regulator should be switched on. The therapist should now move the point finder lead with his/her one hand firmly over various assessed/estimated acu points in turn on the patient’s active hand to determine their sensitivity to electrical current. The therapist’s other hand should be holding the regulating knob and moving it gradually from position 1 towards position 10.
As soon as current passes from the lead to the acu point, the patient will show a reaction in the form of a hand jerk, gesture or facial expression. The therapist should note the reading of the regulator at this point of time. If the reading at this point of time shows between 1 to 5, it indicates a degenerative/chronic, i.e., yin disease. If the reading shows between 6 to 10, it indicates an acute, i.e., yang disease. If there is no disease, the acu point will not be sensitive and current will not pass from the lead to the acu point. The name of the disease is determined based on the sensitivity of various selected points.
Instead of starting the process from marking of 1, time could possibly be saved by initially keeping the regulator at the marking of 6 or 7 and which could be taken in either direction depending on the patient’s reaction.
Once the disease is diagnosed and treatment acu points selected, the instrument can be used for treatment by stimulating these very acu points. Treatment procedure is almost similar to the diagnostic procedure except that the ‘Pulse’ switch is now kept at the minus position to provide intermittent current. If the patient is unable to tolerate the intensity of the current, the ‘Polarity’ switch should also be put into minus position. This will reduce the intensity of current to half. All the required acu points should thus be stimulated in turn.
Precaution
Sensitivity to current depends upon intensity of the disorder as also it varies from person to person. During diagnosis phase, do not linger on a point once its purpose is served as it may cause unnecessary distress to the patient. Similarly, during treatment phase, do not give more current than what a patient can comfortably tolerate.